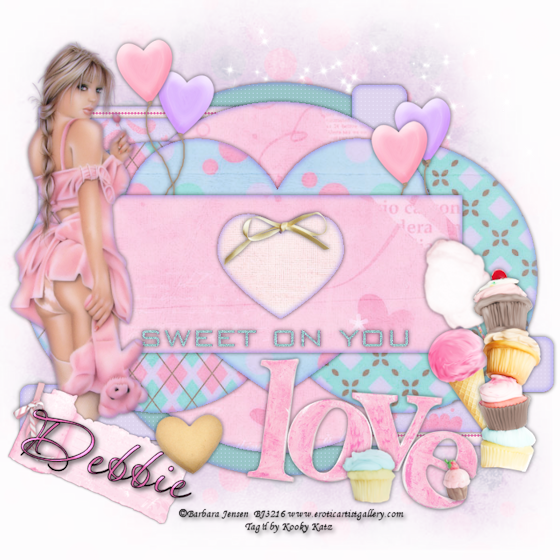
Sweet on You
Supplies
PSPX2 (an older version will work also)
I used the scrapkit A Love so Sweet by Designs by Sarah,
you can purchase it at Pimp My Tags w/Scraps
Thank you Sarah for a very pretty kit to work with!
Tube/s of choice: I am using the artwork of ©Barbara Jensen
You must have a license to use his work.
You can purchase a license here
I am using tag template #445 by Missy at Divine Intentionz
Choice of font, I used Aquarelle here
Mask of choice, I am using EVG_GrungeMask5
You can find this mask at Creative Misfits
Xero Plugin – Porcelain
Notes
Install mask if needed
This tutorial assumes you have a working knowledge of PSP
Use the following settings for drop shadow, unless otherwise stated:
Effects>3D>Drop Shadow>
V 0
H 0
Opacity 60
Blur 8
Color Black
Shadow on new layer unchecked
=^_^= Ready to start? Let’s go! =^_^=
Open the template
Duplicate it (Shift +D)
Close the original without saving
Delete the first layer (Credits)
Delete layer Centre Circle Back
Delete layers Circle Back 1 and 2
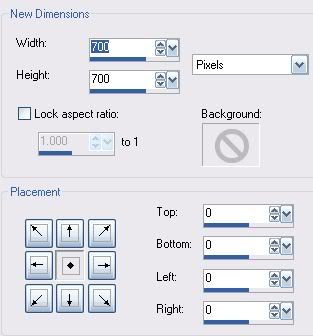
Image>Canvas Size
Use the settings below
Highlight the bottom roster and
flood fill white
Layers>New Raster Layer
Selections>Select All
Choose a dark color that matches your kit
and flood fill the layer
I used color #e370b0
Layers>Load/Save Mask>Load Mask From Disk
Fit to canvas checked
Source luminance checked
Invert transparency not checked
Hide all mask checked
Layers>Merge>Merge Group
Selections>Select None
Highlight Centre Circle
Click inside with your Magic Wand
Copy/Paste Paper 8 as a new layer
Selections/Invert
Tap the delete button on your keyboard
Selections>Select None
Delete the original layer
Add drop Shadow
Apply porcelain effect
Highlight Circle 2
Click inside with your Magic Wand
Copy/Paste Paper 9 as a new layer
Selections/Invert
Tap the delete button on your keyboard
Selections>Select None
Delete the original layer
Add drop Shadow
Apply porcelain effect
Highlight Circle 1
Click inside with your Magic Wand
Copy/Paste Paper 10 as a new layer
Selections/Invert
Tap the delete button on your keyboard
Selections>Select None
Delete the original layer
Add drop Shadow
Apply porcelain effect
Highlight Small Rectangle
Click inside with your Magic Wand
Copy/Paste Paper 4 as a new layer
Selections/Invert
Tap the delete button on your keyboard
Selections>Select None
Delete the original layer
Add drop Shadow
Apply porcelain effect
Highlight Small Rectangle2
Click inside with your Magic Wand
Copy/Paste Paper 4 as a new layer
Selections/Invert
Tap the delete button on your keyboard
Selections>Select None
Delete the original layer
Add drop Shadow
Apply porcelain effect
Highlight Circle 3
Click inside with your Magic Wand
Chose a color from your tube and
Flood fill the layer
Selections>Select None
Add drop Shadow
Apply porcelain effect
Highlight Rounded Edge Rectangle 3
Click on it with your Magic Wand
Chose a color from your tube and
Flood fill the layer
I used color #e0d6ee
Selections>Select None
Add drop Shadow
Apply porcelain effect
Repeat the above step for
Rounded Edge Rectangle 1 and 2
Highlight Square 1
Click inside with your Magic Wand
Copy/Paste Paper 7 as a new layer
Selections/Invert
Tap the delete button on your keyboard
Selections>Select None
Delete the original layer
Add drop Shadow
Apply porcelain effect
Repeat above step for Square 2
Click on Layer Dotted Line Rectangle2
Using a dark color, flood fill
I used color #e370b0
Repeat above step for Layer Dotted Line Rectangle
Highlight Rectangle
Click inside with your Magic Wand
Copy/Paste Paper 8 as a new layer
Selections/Invert
Tap the delete button on your keyboard
Selections>Select None
Delete the original layer
Add drop Shadow
Apply porcelain effect
Highlight Layer Sweet on You
Selections>Select All
Selections>Invert
Flood fill with Color #9ac5c7
Selections>Select None
Adjust>Add Remove/Noise
Add Noise:
Gaussian>Noise 20%>Monochrome Checked
Highlight Layer Heart 1
Click inside with your Magic Wand
Copy/Paste Paper 8 as a new layer
Selections/Invert
Tap the delete button on your keyboard
Selections>Select None
Delete the original layer
Add drop Shadow
Apply porcelain effect
Highlight Layer Heart 2
Click inside with your Magic Wand
Copy/Paste Paper 7 as a new layer
Selections/Invert
Tap the delete button on your keyboard
Selections>Select None
Delete the original layer
Add drop Shadow
Apply porcelain effect
Copy/paste tube/s of your choice
Resize if needed
Add drop shadow
You may choose to place your embellishments the
same way I did, or you go with your own ideas! Use mine
only as an example, after all this is your tag!
Add the proper copyright and license information
Resize to your preference, I used 80%
I used colors #000000 for the foreground
and #e370b0 for the background for my name
1.0 Stroke
Font Size 72
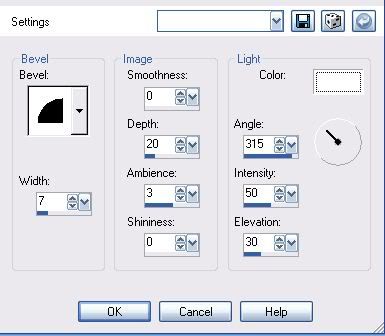
I also gave my name a slight bevel using the following settings
If you want to use the white background you can
Layers>Merge>Merge All (Flatten)
File>Export>JPEG Optimizer
Set compression value to 25
Save to where you want
If you want to use the transparent background you can
File>Export>PNG Optimizer
Click “ok” on the next screen
Save to where you want
I hope you have enjoyed this tutorial!


No comments:
Post a Comment